The 1970 Yamaha CT1 is a classic motorcycle model that has garnered significant attention among enthusiasts and restorers. For those looking to repair or maintain their vintage bike, understanding the wiring diagram is crucial. The wiring diagram provides a detailed map of the electrical connections, ensuring that every component is correctly linked. This article aims to guide you through the process of finding and interpreting the 1970 Yamaha CT1 wiring diagram.
Whether you are a seasoned mechanic or a beginner, having access to the correct wiring diagram can save you time and frustration. The Yamaha CT1 model, with its rich history and popularity, has numerous resources available. Websites like Yamaha-Enduros and YouTube channels offer comprehensive guides and diagrams. By following these resources, you can ensure your 1970 Yamaha CT1 runs smoothly and efficiently.
What are the most common issues with the 1970 Yamaha CT1 wiring
<p>The <b>1970 Yamaha CT1</b> is a vintage motorcycle model known for its reliability and performance. However, like any mechanical device, it can experience electrical issues. One of the most common problems is related to the ignition system. Users have reported difficulties with the ignition, such as the bike not starting or running erratically, which can be attributed to faulty wiring connections or components like the ignition coil or spark plug wires. These issues can be resolved by ensuring all connections are secure and checking for any signs of wear or damage in the wiring.</p> <p>Another common issue is related to the electrical system's overall health. Users have reported problems with the lights and other electrical components, such as the headlight and taillight. These issues can often be traced back to the wiring diagram, which provides a detailed map of the electrical connections. By consulting the <i>wiring diagram</i> and ensuring that all connections are correct, users can troubleshoot and resolve these problems effectively. Additionally, replacing old or worn-out components with new ones can also help in maintaining the bike's performance and reliability.</p>
What are the symptoms of a faulty wiring system in a 1970 Yamaha CT1
<p>The <b>1970 Yamaha CT1</b> is a vintage motorcycle model known for its reliability and performance. However, like any mechanical device, it can experience electrical issues. One of the most common problems is related to the ignition system. Users have reported difficulties with the ignition, such as the bike not starting or running erratically, which can be attributed to faulty wiring connections or components like the ignition coil or spark plug wires. These issues can be resolved by ensuring all connections are secure and checking for any signs of wear or damage in the wiring.</p> <p>Another common issue is related to the electrical system's overall health. Users have reported problems with the lights and other electrical components, such as the headlight and taillight. These issues can often be traced back to the wiring diagram, which provides a detailed map of the electrical connections. By consulting the <i>wiring diagram</i> and ensuring that all connections are correct, users can troubleshoot and resolve these problems effectively. Additionally, replacing old or worn-out components with new ones can also help in maintaining the bike's performance and reliability.</p>
How can I test the key switch on my 1970 Yamaha CT1
<p>To test the key switch on your <b>1970 Yamaha CT1</b>, you can use an ohm meter. This tool will help you determine if the key switch is functioning correctly. Here’s how you can do it:</p> <p>1. **Set Up the Ohm Meter**: Ensure your ohm meter is set to the correct range (usually 200 ohms or higher). 2. **Check the Key Switch**: Connect the ohm meter leads to the key switch terminals. The key switch should have multiple positions (off, on, and on with lights). 3. **Test Each Position**: Rotate the key switch to each position and measure the resistance. The resistance should change as you move from one position to another. 4. **Compare with Yamaha Wiring Diagram**: Refer to the <i>wiring diagram</i> provided by Yamaha to ensure that your measurements match the expected values for each position. 5. **Identify Issues**: If the resistance readings do not match the expected values, it may indicate a faulty key switch or wiring issue. By following these steps, you can effectively test the key switch on your <b>1970 Yamaha CT1</b> and identify any potential problems.</p>
How to test key switch
<p>The <b>1970 Yamaha CT1</b> is a vintage motorcycle model known for its reliability and performance. However, like any mechanical device, it can experience electrical issues. One of the most common problems is related to the ignition system. Users have reported difficulties with the ignition, such as the bike not starting or running erratically, which can be attributed to faulty wiring connections or components like the ignition coil or spark plug wires. These issues can be resolved by ensuring all connections are secure and checking for any signs of wear or damage in the wiring.</p> <p>Another common issue is related to the electrical system's overall health. Users have reported problems with the lights and other electrical components, such as the headlight and taillight. These issues can often be traced back to the wiring diagram, which provides a detailed map of the electrical connections. By consulting the <i>wiring diagram</i> and ensuring that all connections are correct, users can troubleshoot and resolve these problems effectively. Additionally, replacing old or worn-out components with new ones can also help in maintaining the bike's performance and reliability.</p>
Thank you for reading our article on the 1970 Yamaha CT1. We hope you found the information helpful in understanding the wiring diagram and troubleshooting common issues with your vintage motorcycle. The wiring diagram is a crucial tool for any motorcycle owner, and it can significantly simplify the process of diagnosing and fixing problems. By consulting the wiring diagram, you can ensure that all electrical connections are correct, which is essential for maintaining the performance and reliability of your bike. Whether you are a seasoned mechanic or a beginner, having access to the correct 1970 Yamaha CT1 wiring diagram can save you time and frustration in the long run.
As you continue to work on your 1970 Yamaha CT1, remember to always refer to the wiring diagram for guidance. This will help you avoid any potential mistakes and ensure that your repairs are done correctly. Additionally, if you have any further questions or need additional resources, there are many online forums and communities dedicated to vintage motorcycles where you can seek advice from experienced enthusiasts. We wish you the best of luck with your repairs and hope that your 1970 Yamaha CT1 will continue to run smoothly and efficiently. Thank you once again for reading, and we look forward to your next visit.
What are the key steps to test a key switch on a 1970 Yamaha CT1
<p>To test a key switch on a <b>1970 Yamaha CT1</b>, follow these key steps:</p> <p>1. **Use an Ohm Meter**: Ensure your ohm meter is set to the correct range (usually 200 ohms or higher). Connect the ohm meter leads to the key switch terminals. The key switch should have multiple positions (off, on, and on with lights). Rotate the key switch to each position and measure the resistance. The resistance should change as you move from one position to another.</p> <p>2. **Consult the Wiring Diagram**: Refer to the <i>wiring diagram</i> provided by Yamaha to ensure that your measurements match the expected values for each position. This will help you identify any discrepancies and pinpoint potential issues.</p> <p>3. **Check for Shorts**: If the resistance readings do not match the expected values, it may indicate a faulty key switch or wiring issue. Check for any signs of wear or damage in the wiring and ensure all connections are secure.</p> <p>4. **Test with a Light**: Use a light attached to the wire running down into the side cover. Rotate the flywheel till the points are open, then carefully use a screwdriver to make an electrical connection between the two contact points. If the light goes on and off, it confirms that the points are breaking and closing correctly. If not, there might be an electrical short in the points system, possibly due to tiny insulating washers or other issues.</p> <p>5. **Verify with a Multi-Tester**: If you have a multi-tester, use it to follow continuity to the rectifier and other components. This can help identify if the problem lies with the key switch or other parts of the electrical system.</p> <p>By following these steps, you can effectively test the key switch on your <b>1970 Yamaha CT1</b> and identify any potential problems.</p>
Learn how to diagnose and repair your Godrej Washing Machine with our comprehensive guide on the Godrej Washing Machine Wiring Diagram. Improve energy efficiency and extend appliance lifespan.
Understanding the Basics of Godrej Washing Machine Wiring Diagram
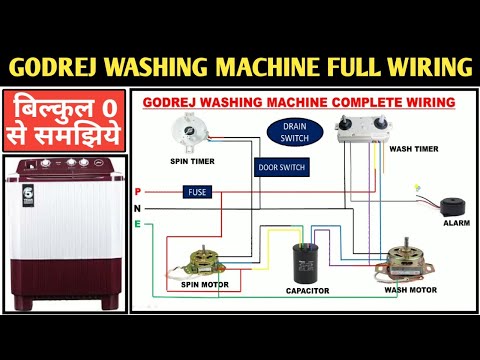
The Godrej Washing Machine Wiring Diagram is a crucial document for any homeowner or DIY enthusiast looking to diagnose and repair issues with their washing machine. This diagram provides a detailed layout of the electrical connections within the machine, helping users identify and fix problems efficiently. Whether you are dealing with a top-load or front-load machine, understanding the wiring diagram is essential for maintaining your appliance.
Components of the Wiring Diagram
The wiring diagram for a Godrej washing machine includes several key components. These include the motor connections, control panel wiring, and sensor activation. The motor connections ensure that the machine's motor receives the necessary power to operate. The control panel wiring manages various functions such as start/stop, wash cycle selection, and temperature control. Sensor activation is also critical, as it monitors water levels, detergent dispensers, and other operational parameters.
Top-Load vs. Front-Load Machines
The wiring diagrams for top-load and front-load Godrej washing machines differ in several ways. Top-load machines have their motors located at the bottom, while front-load machines have theirs at the rear or bottom. The control panels are also positioned differently, with top-load machines having theirs at the top and front-load machines at the front. These differences reflect the unique operational requirements of each type of machine.
Energy Efficiency Tips
Improving the energy efficiency of your Godrej washing machine involves several strategies. One of the most effective ways is to wash full loads, as this reduces the number of cycles needed and thus saves energy. Using cold water instead of hot water can also significantly reduce energy consumption. Additionally, using high-efficiency detergent can help reduce the amount of water needed for rinsing.
Maintenance and Repair
Maintaining your Godrej washing machine is crucial for its longevity and efficiency. Regularly cleaning the lint trap and drum can help prevent mildew and ensure that your clothes are fresh. Additionally, checking and replacing worn-out parts can prevent more serious issues from arising. If you encounter any problems, consulting the wiring diagram can help you diagnose and repair the issue efficiently.
Resources for Further Learning
For those who want to delve deeper into the world of washing machine wiring, there are several resources available. Online forums and communities dedicated to DIY repairs and maintenance can provide valuable insights and tips from experienced users. Additionally, YouTube videos and tutorials can offer step-by-step guides on how to repair various parts of your washing machine.
Conclusion
In conclusion, understanding the Godrej Washing Machine Wiring Diagram is essential for any homeowner or DIY enthusiast. By grasping the components and differences between top-load and front-load machines, you can improve the energy efficiency of your appliance and perform routine maintenance and repairs with confidence. Whether you are a seasoned DIY expert or just starting out, this knowledge will empower you to tackle any technical challenges that arise with your washing machine.
Additional Tips for Energy Efficiency
Finally, here are some additional tips to enhance the energy efficiency of your Godrej washing machine. Using the right water level for the load size can help reduce water consumption. Skipping the sanitary cycle unless necessary can also save energy. Lastly, using the spin cycle to extract more water from clothes before drying can reduce the dryer's workload and save energy.
Final Thoughts
By implementing these strategies and understanding the wiring diagram, you can significantly improve the efficiency and longevity of your Godrej washing machine. Remember to always refer to the user manual and consult professional help if you are unsure about any aspect of the repair or maintenance process. With these tips and resources, you are well-equipped to handle any challenge that comes your way.
For those who have ever struggled to diagnose issues with their Godrej Washing Machine, understanding the wiring diagram is a crucial step. This detailed guide will walk you through the intricate connections that power your appliance, ensuring you can identify and fix problems efficiently. Whether you're a seasoned DIY enthusiast or a novice homeowner, this article aims to provide you with the necessary knowledge to tackle any technical challenges that arise with your washing machine.
The wiring diagram of a Godrej Washing Machine is a complex network of electrical connections that control various functions such as water supply, motor operation, and sensor activation. By examining this diagram, you can pinpoint issues like faulty sensors, malfunctioning motors, or incorrect wiring configurations. This knowledge will empower you to perform routine maintenance and repairs, extending the lifespan of your appliance and ensuring it continues to perform optimally. Stay tuned for a comprehensive breakdown of the wiring diagram and its applications.
What are the key components in a Godrej washing machine wiring diagram
The key components in a Godrej washing machine wiring diagram include:
Fuzzy Logic Control: This advanced technology ensures efficient and precise control over various washing machine functions, such as water supply and motor operation.
Wiring Harness: This is a crucial part of the wiring diagram, connecting different components of the washing machine, including sensors, motors, and control panels.
Electrical Connections: These connections control the flow of electricity to various parts of the machine, such as the motor, sensors, and user interface.
Sensor Activation: The wiring diagram outlines how sensors are activated to monitor and control different aspects of the washing cycle, ensuring optimal performance.
Motor Operation: The diagram details the electrical connections that power the motor, which is essential for the machine's operation.
These components work together to ensure the smooth functioning of the Godrej washing machine.
What are the main differences between the wiring diagrams of top load and front load Godrej washing machines
The main differences between the wiring diagrams of top load and front load Godrej washing machines lie in the specific components and connections required for each type of machine. Here are the key distinctions:
Top Load Wiring Diagram
Motor Connections: The wiring diagram for a top load Godrej washing machine will include connections for the motor, which is typically located at the bottom of the machine. These connections ensure proper power supply to the motor.
Control Panel Wiring: The control panel, which is usually located at the top of the machine, will have its own set of wiring connections. These connections control various functions such as start/stop, wash cycle selection, and temperature control.
Sensor Activation: Sensors in top load machines are often connected to the control panel to monitor water levels, detergent dispensers, and other operational parameters.
Wiring Harness: The wiring harness for top load machines will be designed to accommodate the specific layout of the machine, ensuring that all electrical components are properly connected.
Front Load Wiring Diagram
Motor Connections: Front load machines have their motors located at the rear or bottom of the machine. The wiring diagram will include connections for these motors, ensuring they receive the necessary power.
Control Panel Wiring: The control panel in front load machines is typically located at the front of the machine and will have its own set of wiring connections. These connections control various functions such as start/stop, wash cycle selection, and temperature control.
Sensor Activation: Sensors in front load machines are often connected to the control panel to monitor water levels, detergent dispensers, and other operational parameters. The design may differ slightly due to the horizontal axis of the drum.
Wiring Harness: The wiring harness for front load machines will be designed to accommodate the specific layout of the machine, ensuring that all electrical components are properly connected.
Key Differences
Layout: The primary difference is in the layout of the machine. Top load machines have their components arranged vertically, while front load machines have them arranged horizontally.
Component Placement: The placement of components such as motors and control panels differs between the two types of machines.
Wiring Complexity: The wiring complexity may vary due to the different layouts and component placements.
Understanding these differences is crucial for diagnosing and repairing issues with either type of Godrej washing machine.
How does the energy consumption impact the wiring diagrams of top-load and front-load Godrej washing machines
The energy consumption of top-load and front-load Godrej washing machines impacts their wiring diagrams in distinct ways, reflecting the different operational requirements of each type of machine.
Top-Load Washing Machines
Energy Consumption: Top-load washing machines generally consume less electricity compared to front-load machines due to their shorter wash cycles. This lower energy consumption is reflected in the wiring diagram through:
Power Supply: The wiring diagram for top-load machines will include connections that support the reduced power requirements, ensuring efficient energy usage.
Control Panel Wiring: The control panel wiring will be designed to manage the shorter wash cycles, which typically involve fewer electrical components and less complex control logic.
Sensor Activation: Sensors in top-load machines are often less complex and may not require as much power, leading to simpler wiring configurations.
Front-Load Washing Machines
Energy Consumption: Front-load washing machines, on the other hand, consume less water but may use more electricity due to their longer wash cycles. This higher energy consumption is reflected in the wiring diagram through:
Power Supply: The wiring diagram for front-load machines will include connections that support the higher power requirements, ensuring efficient energy usage.
Control Panel Wiring: The control panel wiring will be designed to manage the more complex wash cycles, which typically involve more electrical components and advanced control logic.
Sensor Activation: Sensors in front-load machines are often more advanced and require more power, leading to more complex wiring configurations.
Key Differences
Power Requirements: The wiring diagrams for top-load and front-load machines differ in terms of power supply and control panel wiring to accommodate the varying energy consumption needs.
Sensor Complexity: The complexity of sensors and their activation in the wiring diagram also varies, with front-load machines requiring more advanced and power-hungry sensors.
Cycle Duration: The duration of wash cycles affects the wiring diagram, with top-load machines having shorter cycles and simpler wiring, while front-load machines have longer cycles and more complex wiring.
Understanding these differences is crucial for diagnosing and repairing issues with either type of Godrej washing machine, ensuring that the wiring diagram accurately reflects the machine's operational requirements.
Energy saving washing machine tips
To save energy when using your washing machine, consider the following tips:
1. Wash Full Loads
Washing full loads of laundry is more energy-efficient because the machine uses the same amount of energy to wash a full load as it does to wash a partial load. Additionally, washing more clothes at once means that you need to wash less often, which saves energy. However, ensure you don't overload the machine, as this can reduce its effectiveness and increase wear and tear on the machine.
2. Use the Right Water Level
Using too much water wastes energy, while using too little can reduce the effectiveness of the wash. Most modern washing machines have load sensing technology that automatically adjusts the water level based on the size of the load. If your machine doesn't have this feature, make sure to use the right water level for the amount of laundry you're washing. Typically, the water level should be just enough to cover the clothes, without any excess water.
3. Use Cold Water
Heating water is one of the most energy-intensive parts of doing laundry. Washing clothes in cold water instead of hot water can reduce energy consumption by up to 90%. Additionally, using cold water is often better for preserving the color and quality of clothes. However, some stains may require hot water to remove, so it's important to check the care label on the garment before washing. If you have a stubborn stain, you may want to treat it before putting it into your washing machine for a cold wash.
4. Choose an Efficient Washer
Energy-efficient washing machines are designed to use less water and electricity than traditional models. Look for models with great energy ratings, such as those with the Energy Star certification. These machines meet specific efficiency guidelines set by your country’s energy agency. While more energy-efficient washing machines may have a higher upfront cost, they can save you money on your energy bills in the long run.
5. Air Dry Clothes
Air drying clothes is the most energy-efficient way to dry them. Hang clothes outside on a clothesline or indoors on a drying rack to save energy. Additionally, air drying is often better for preserving the quality of clothes, as the heat from the dryer can damage certain fabrics. If you do need to use a dryer machine, make sure to use the appropriate heat setting for the type of fabric you're drying.
6. Wash Clothes Less Often
Not all clothes need to be washed after every use. Items like jeans or jackets can often be worn multiple times before needing to be washed. Washing clothes less often reduces the number of loads you need to wash and saves energy. Additionally, make sure to spot clean clothes when possible to avoid unnecessary washing. When washing clothes, make sure to sort them by color and fabric type to ensure optimal cleaning and avoid the need for rewashing.
7. Maintain Your Washer
Regular maintenance is crucial for ensuring your washer operates efficiently. Check your owner’s manual for instructions on how to clean the lint trap, drum, and ducting system. Cleaning these parts regularly helps prevent mildew from growing and keeps your clothes fresh. Additionally, running a short, low-volume hot cycle with a cleaning solution can help maintain your washer’s performance.By implementing these strategies, you can significantly improve the energy efficiency of your washing machine and reduce your monthly energy bills.
Thank you for reading our comprehensive guide on the Godrej Washing Machine Wiring Diagram. We hope that this article has provided you with valuable insights into the intricate connections that power your appliance. Whether you are a seasoned DIY enthusiast or a novice homeowner, understanding the wiring diagram is essential for diagnosing and repairing issues with your washing machine. By examining the wiring diagram, you can pinpoint problems such as faulty sensors, malfunctioning motors, or incorrect wiring configurations. This knowledge will empower you to perform routine maintenance and repairs, extending the lifespan of your appliance and ensuring it continues to perform optimally. Additionally, this guide has highlighted the key differences between the wiring diagrams of top-load and front-load Godrej Washing Machines, helping you navigate the unique requirements of each type of machine.
We believe that this article has been informative and helpful in your journey to understand the Godrej Washing Machine Wiring Diagram. If you have any further questions or need additional assistance, please feel free to reach out to us. We are committed to providing you with accurate and reliable information to help you tackle any technical challenges that arise with your washing machine. Remember, a well-maintained appliance is not only more efficient but also more durable. By mastering the wiring diagram, you are taking the first step towards ensuring your Godrej Washing Machine continues to serve you well for years to come. Thank you once again for your interest, and we look forward to helping you with any future queries.
How can I improve the energy efficiency of my current washing machine
To improve the energy efficiency of your current washing machine, consider the following strategies:
1. Invest in an Energy Star Machine
If you're in the market for a new washing machine, purchase an Energy Star unit. These machines use 50% less water and about 25% less energy compared to standard models.
2. Use High Efficiency (HE) Detergent
HE detergent creates fewer suds and requires less water to rinse clean, making it a more energy-efficient option.
3. Wash Cold
Washing in cold water can reduce energy consumption by up to 90% compared to hot water. This is because heating water accounts for 75% to 90% of the energy used by a washing machine.
4. Do a Full Load
Running a full load in your washing machine uses the same amount of electricity, water, and other resources as a partial load. This ensures that your machine operates at its most efficient level.
5. Skip the Sanitary Cycle
Unless absolutely necessary, skip the sanitary cycle. It uses significantly more energy than standard settings.
6. Use the Spin Cycle
Using the spin cycle extracts more water from your clothes, reducing the dryer's workload and saving energy.
7. Maintain Your Machine
Regular maintenance is crucial. Check your owner’s manual for instructions and make maintenance a part of your routine to ensure your machine operates efficiently.
8. Dry Similar Items Together
Dry lightweight fabrics separately from heavyweight fabrics to optimize drying time and reduce energy consumption.
9. Use Dryer Balls
Dryer balls help separate clothes, increasing airflow and reducing drying time. They also help reduce static.
10. Use the Automatic Cycle
Many modern dryers come with internal moisture sensors that detect when clothes are dry and stop the cycle immediately, reducing unnecessary energy use.
11. Service Your Dryer Regularly
Clean the lint trap after every use and follow other maintenance tips to keep your dryer running efficiently and avoid potential fires.
12. Consider Line Drying
If possible, use a clothesline or drying rack to dry your clothes. This method consumes no electricity and is a cost-effective way to dry your clothes.By implementing these strategies, you can significantly improve the energy efficiency of your washing machine and reduce your monthly energy bills.
Discover how the Glencoe Spanish 1 Workbook Answers PDF can enhance your language learning journey with detailed solutions and structured practice.
Introduction to Glencoe Spanish 1 Workbook
The Glencoe Spanish 1 Workbook is a comprehensive resource designed to help students master the Spanish language. This workbook is part of the ¡Buen viaje! series, which is known for its engaging and structured approach to language learning. The workbook provides detailed answers to chapter exercises, ensuring that learners can review and reinforce their understanding of key concepts.
Key Features of the Workbook
The Glencoe Spanish 1 Workbook offers several key features that make it an invaluable tool for language learners. One of the primary features is the inclusion of audio activities that help students improve their listening skills. These activities are designed to be engaging and interactive, making the learning process more enjoyable and effective. Additionally, the workbook includes a variety of exercises and quizzes that cater to different learning styles, ensuring that students can find the right fit for their needs.
Benefits of Using the Workbook
Using the Glencoe Spanish 1 Workbook can have numerous benefits for language learners. One of the most significant advantages is the ability to practice consistently. The workbook provides a structured approach to learning, with each chapter building on the previous one. This helps learners to develop a strong foundation in the language and to progress gradually. Furthermore, the workbook is designed to be flexible, allowing learners to work at their own pace and to review material as needed.
How to Access the Workbook Answers
Accessing the answers to the Glencoe Spanish 1 Workbook is straightforward. The workbook includes a comprehensive answer key that provides detailed solutions to all the exercises and quizzes. This allows learners to check their work and to understand any mistakes they may have made. Additionally, the answer key helps learners to reinforce their understanding of key concepts and to identify areas where they need further practice.
Common Challenges and Solutions
Students using the Glencoe Spanish 1 Workbook may encounter several challenges. One common issue is the difficulty in understanding and mastering the vocabulary and grammar concepts presented in the workbook. To overcome this, learners can use the workbook’s resources, such as the audio activities and the answer key, to reinforce their understanding. Additionally, learners can seek additional support from teachers or tutors to help them better grasp the material.
Using the Workbook Effectively
To use the Glencoe Spanish 1 Workbook effectively, learners should follow a structured approach. This involves setting aside dedicated time each day to practice, using the workbook’s resources consistently, and seeking help when needed. Additionally, learners should review their progress regularly to identify areas where they need more practice. By following this approach, learners can maximize the benefits of the workbook and achieve fluency in Spanish.
Conclusion
In conclusion, the Glencoe Spanish 1 Workbook is a valuable resource for anyone looking to learn Spanish. With its comprehensive answer key, engaging audio activities, and structured approach, it provides learners with everything they need to succeed. Whether you are a student, teacher, or simply someone interested in learning Spanish, this workbook is an essential tool that can help you achieve your goals. By using the workbook effectively and consistently, you can overcome any challenges and achieve fluency in Spanish.
Additional Resources
For those who need additional support, there are several resources available. The ¡Buen viaje! series includes a variety of supplementary materials, such as teacher’s guides, audio tapes, and video activities. These resources can provide extra practice and help learners to reinforce their understanding of key concepts. Additionally, online platforms like Quizlet offer step-by-step solutions to end-of-chapter questions, making it easier for learners to find the answers they need.
Are you looking for the Glencoe Spanish 1 Workbook Answers PDF? This comprehensive resource is designed to help students master the Spanish language with ease. The workbook provides detailed answers to chapter exercises, ensuring that learners can review and reinforce their understanding of key concepts. Whether you are a beginner or an advanced student, this guide offers a structured approach to language learning, making it an invaluable tool for both classroom and self-study.
The Glencoe Spanish 1 Workbook Answers PDF is a treasure trove of educational materials, meticulously crafted to support students in their journey to fluency. With step-by-step solutions to end-of-chapter questions, this resource helps learners overcome common challenges and build confidence in their language skills. Whether you are preparing for exams or simply looking to improve your proficiency, this workbook is an essential companion that will guide you every step of the way.
What are the most common challenges students face when using the Glencoe Spanish 1 workbook
<p>The <b>Glencoe Spanish 1 workbook</b> is a valuable resource for students learning Spanish, but it can present several challenges. One of the most common issues is the difficulty in understanding and mastering the vocabulary and grammar concepts presented in the workbook. Students often struggle with the pronunciation of Spanish words and the correct usage of verb conjugations, which can hinder their ability to communicate effectively in the language. Additionally, the workbook's pace and content may not always align with the students' learning styles or prior knowledge, leading to frustration and disengagement.</p> <p>Another significant challenge is the lack of practice opportunities and feedback. While the workbook provides exercises and quizzes, some students may find it insufficient to reinforce their learning. This can lead to a gap between understanding the theoretical concepts and applying them in practical situations. Furthermore, the workbook's design and layout may not be user-friendly for all learners, making it harder for them to navigate and find the answers they need. These challenges highlight the importance of supplementary resources and support systems to help students overcome these obstacles and achieve fluency in Spanish.</p>
What specific difficulties do students encounter with the audio activities in the Glencoe Spanish 1 workbook
<p>Students using the <b>Glencoe Spanish 1 workbook</b> often face several specific difficulties with the audio activities. One of the primary challenges is understanding the speaker's accent and rate of speech. Many students struggle to comprehend the audio due to the speaker's pronunciation and speed, which can make it hard to follow along with the material. Additionally, students may have limited vocabulary, which hinders their ability to understand the spoken text. This lack of vocabulary can lead to frustration and decreased motivation in listening comprehension tasks.</p> <p>Another significant issue is the length and complexity of the audio clips. Some students find it difficult to focus and maintain concentration over longer periods, leading to missed information and decreased comprehension. Furthermore, the use of colloquial language and slang in the audio materials can be challenging for students who are accustomed to formal language. These difficulties highlight the need for teachers to provide additional support and resources to help students overcome these obstacles and improve their listening skills.</p>
How do students' listening skills improve with repeated use of the audio activities in the Glencoe Spanish 1 workbook
<p>Students' listening skills can significantly improve with repeated use of the audio activities in the <b>Glencoe Spanish 1 workbook</b>. One of the key benefits is the development of phonological awareness. By repeatedly listening to native speakers, students become more adept at distinguishing between sounds, which is crucial for understanding and reproducing Spanish pronunciation. Additionally, the audio activities help students to recognize and recall vocabulary more effectively, enhancing their overall comprehension of the language. The repetitive exposure to different accents and speaking styles also helps students to become more comfortable with the natural flow of spoken Spanish, making it easier for them to follow and understand various conversations.</p> <p>Moreover, the audio activities in the workbook provide a structured approach to listening practice. By focusing on specific tasks such as identifying mispronounced words, completing gap fills, and summarizing content, students are able to build their listening skills in a systematic and engaging manner. This structured practice helps to reinforce new vocabulary and grammatical structures, leading to improved retention and application of these skills in real-life situations. Furthermore, the use of audio materials allows teachers to monitor student progress and provide targeted feedback, ensuring that students receive the support they need to overcome any challenges and achieve fluency in Spanish.</p>
How to write engaging blog headlines
To write engaging blog headlines, follow these key principles:
Be Specific and Descriptive: Ensure your headline clearly conveys the content and purpose of your blog post. Avoid ambiguity and provide a clear idea of what readers can expect to learn or gain from the post.
Use Attention-Grabbing Language: Incorporate vivid, eye-catching language to pique the reader’s interest. This can include using second-person pronouns, superlatives, and power words like “effortless” or “secrets”.
Optimize for SEO: Include relevant keywords in your headline to improve search engine rankings. However, balance SEO optimization with readability to avoid headlines that feel stuffed with keywords.
Use Numbers and Lists: Headlines that use numbers or lists can be more engaging and informative. For example, “10 Tips for Better Time Management” or “5 Life-Changing Habits for Success”.
Showcase Case Studies: Highlight real-life examples or case studies to demonstrate the effectiveness of your content. This can include client testimonials or success stories.
Include Relevant Images: High-quality images can enhance the visual appeal of your blog post and make it more shareable on social media.
Create Compelling Headings: Use H1 tags and subheads to organize and make your content more scannable. This helps readers quickly understand the structure and main points of your blog post.
Maintain Flow: Ensure your headline flows well with the rest of the content. Avoid jarring repetition of words and maintain a clear, concise tone throughout.
Test and Refine: Test different versions of your headline to see which one performs best. Use data to refine your approach and improve engagement.
Keep it Short and Sweet: Aim for headlines that are 60 characters or less. This makes them more memorable and easier to read, especially in search results.
By incorporating these strategies, you can craft headlines that not only attract readers but also drive engagement and increase the effectiveness of your blog posts.
Thank you for visiting our blog and reading about the Glencoe Spanish 1 Workbook Answers PDF. We hope you found the information provided to be informative and helpful. Mastering a new language can be a challenging but rewarding experience, and we are committed to supporting you every step of the way. Whether you are a student, teacher, or simply someone interested in learning Spanish, we believe that the Glencoe Spanish 1 Workbook Answers PDF is an invaluable resource that can help you achieve your goals. By providing detailed answers to chapter exercises, this workbook ensures that learners can review and reinforce their understanding of key concepts, making it an essential tool for both classroom and self-study.
We understand that navigating the complexities of a new language can be daunting, but with the right resources, you can overcome any obstacle. The Glencoe Spanish 1 Workbook Answers PDF is designed to support students in their journey to fluency, offering step-by-step solutions to end-of-chapter questions. This comprehensive guide helps learners build confidence in their language skills, ensuring they are well-prepared for exams or everyday conversations. We encourage you to explore this resource further and discover how it can enhance your learning experience. Remember, consistent practice and dedication are key to achieving fluency in Spanish. We wish you continued success in your language learning endeavors and hope you find the Glencoe Spanish 1 Workbook Answers PDF to be a valuable companion on your journey.
How can I effectively use transition words in my blog posts
<p>Thank you for visiting our blog and reading about the <b>Glencoe Spanish 1 Workbook Answers PDF</b>. We hope you found the information provided to be informative and helpful. Mastering a new language can be a challenging but rewarding experience, and we are committed to supporting you every step of the way. Whether you are a student, teacher, or simply someone interested in learning Spanish, we believe that the <b>Glencoe Spanish 1 Workbook Answers PDF</b> is an invaluable resource that can help you achieve your goals. By providing detailed answers to chapter exercises, this workbook ensures that learners can review and reinforce their understanding of key concepts, making it an essential tool for both classroom and self-study.</p> <p>We understand that navigating the complexities of a new language can be daunting, but with the right resources, you can overcome any obstacle. The <b>Glencoe Spanish 1 Workbook Answers PDF</b> is designed to support students in their journey to fluency, offering step-by-step solutions to end-of-chapter questions. This comprehensive guide helps learners build confidence in their language skills, ensuring they are well-prepared for exams or everyday conversations. We encourage you to explore this resource further and discover how it can enhance your learning experience. Remember, consistent practice and dedication are key to achieving fluency in Spanish. We wish you continued success in your language learning endeavors and hope you find the <b>Glencoe Spanish 1 Workbook Answers PDF</b> to be a valuable companion on your journey.</p>
Discover the 2005 Tundra Stereo Wiring Diagram to upgrade your audio system with clear instructions and expert tips. Enhance your driving experience with professional-grade sound quality.
Understanding the 2005 Tundra Stereo Wiring Diagram
The 2005 Toyota Tundra is a popular vehicle known for its reliability and ruggedness, but when it comes to upgrading the stereo system, navigating the wiring can be a daunting task. For those who are eager to enhance their audio experience, understanding the stereo wiring diagram is crucial. This article aims to provide a comprehensive guide to help you identify and connect the wires correctly, ensuring a seamless upgrade process.
Importance of the 2005 Tundra Stereo Wiring Diagram
The stereo wiring diagram serves as a map for your car's electrical system, helping you locate and connect the various wires correctly. Without it, you might end up with a tangled mess of wires, leading to potential electrical issues or even damage to your vehicle's components. By using a reliable 2005 Tundra stereo wiring diagram, you can ensure that your upgrade is done safely and efficiently.
Common Issues with Upgrading the Stereo System
When upgrading the stereo in a 2005 Tundra, several common issues can arise. One of the most frequent problems is the incompatibility of aftermarket head units with the standard Toyota harness adapter, as noted by users on forums like Reddit and Toyota forums. Additionally, issues with the amplifier are common, leading to audio problems and rattling noises, as discussed on JustAnswer. These challenges highlight the importance of thorough research and preparation before embarking on a stereo upgrade.
Choosing the Right Aftermarket Stereo Brand
Choosing the right aftermarket stereo brand is crucial for achieving the best sound quality. Brands like Kenwood, Pioneer, and Alpine are known for their high-quality products and compatibility with various vehicle models. These brands offer a range of options, from basic to advanced features, ensuring that you can find a system that meets your needs and budget.
Benefits of Using Infinity Speakers
The Infinity speakers are a popular choice for upgrading the audio system in a 2005 Tundra. One of the primary benefits of using Infinity speakers is their ability to provide clear and detailed sound quality. These speakers are known for their high-fidelity performance, which can significantly enhance the overall audio experience in your vehicle. Additionally, Infinity speakers are often praised for their durability and reliability, making them a great option for those who want a long-lasting upgrade without compromising on sound quality.
Installation Tips for a Smooth Upgrade
When installing a new stereo system, it is essential to follow proper installation tips to ensure a smooth and successful upgrade. Start by disconnecting the battery to prevent any electrical shocks. Use a wiring harness adapter to connect the new head unit to the vehicle's wiring system. Consult the 2005 Tundra stereo wiring diagram to ensure that all wires are connected correctly. Finally, test the system to ensure that everything is working as expected.
Resources for Finding the Right Wiring Diagram
There are several resources available for finding the right 2005 Tundra stereo wiring diagram. Websites like Crutchfield and AutoZone offer detailed wiring diagrams and installation guides. Additionally, forums such as Toyota Tundra Forums and The 12 Volt provide valuable information and advice from experienced users. These resources can help you navigate the complex process of upgrading your stereo system.
Conclusion
Upgrading the stereo system in a 2005 Tundra can significantly enhance your driving experience. By understanding the stereo wiring diagram and choosing the right aftermarket stereo brand, you can achieve professional-grade sound quality. Remember to follow proper installation tips and consult reliable resources to ensure a smooth and successful upgrade. With the right tools and knowledge, you can transform your 2005 Tundra into a state-of-the-art audio system.
Final Thoughts
Finally, it is important to note that upgrading your stereo system is not just about the hardware; it is also about the experience. With the right components and proper installation, you can enjoy a more immersive and enjoyable driving experience. Whether you are a seasoned DIY enthusiast or a newcomer to car electronics, this guide aims to provide a comprehensive resource for navigating the stereo wiring diagram and ensuring a seamless upgrade process.
Embedding Images
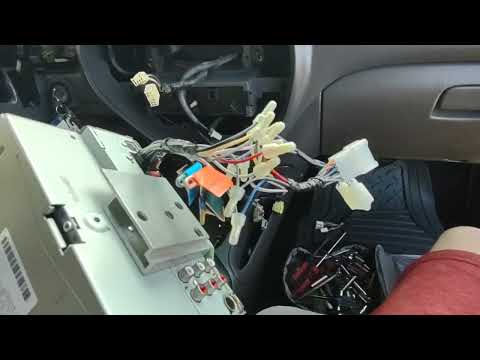
For those who prefer visual aids, embedding images can be a great way to illustrate the process. For example, you can use images of the wiring harnesses and connectors to help users understand the different components involved in the upgrade. This can make the process less intimidating and more accessible to those who are new to car electronics.
Conclusion
Thank you for reading our article on the 2005 Tundra Stereo Wiring Diagram. We hope you found the information helpful in understanding the wiring process for your vehicle. Upgrading your stereo system can significantly enhance your driving experience, and with the right tools and knowledge, you can achieve professional-grade sound quality. Whether you're a seasoned DIY enthusiast or a newcomer to car electronics, our guide aims to provide a comprehensive resource for navigating the stereo wiring diagram and ensuring a seamless upgrade process.
Final Thoughts
As you continue to explore the world of car audio upgrades, remember that the 2005 Tundra Stereo Wiring Diagram is just the first step. Choosing the right aftermarket stereo brand is crucial for achieving the best sound quality. Brands like Kenwood, Pioneer, and Alpine are known for their high-quality products and compatibility with various vehicle models. By selecting a reputable brand and following our wiring guide, you can transform your 2005 Tundra into a state-of-the-art audio system. We encourage you to share your experiences and tips with our community, as we strive to provide the most informative and helpful content for all car enthusiasts. Happy upgrading!
The 2005 Toyota Tundra is a beloved vehicle known for its reliability and ruggedness, but when it comes to upgrading the stereo system, navigating the wiring can be a daunting task. For those who are eager to enhance their audio experience, understanding the stereo wiring diagram is crucial. This article aims to provide a comprehensive guide to help you identify and connect the wires correctly, ensuring a seamless upgrade process.
Whether you're a seasoned DIY enthusiast or a newcomer to car electronics, this guide will walk you through the essential steps and provide you with the necessary information to tackle the project confidently. By following these instructions, you'll be able to transform your 2005 Tundra into a state-of-the-art audio system, enhancing both your driving experience and overall enjoyment of your vehicle.
What are the most common issues when upgrading the stereo in a 2005 Tundra
<p>The <b>2005 Toyota Tundra</b> is a beloved vehicle known for its reliability and ruggedness, but when it comes to upgrading the stereo system, navigating the wiring can be a daunting task. For those who are eager to enhance their audio experience, understanding the <i>stereo wiring diagram</i> is crucial. This article aims to provide a comprehensive guide to help you identify and connect the wires correctly, ensuring a seamless upgrade process.</p> <p>When upgrading the stereo in a <b>2005 Tundra</b>, several common issues can arise. One of the most frequent problems is the incompatibility of aftermarket head units with the standard Toyota harness adapter, as noted by users on forums like Reddit and Toyota forums. Additionally, issues with the amplifier are common, leading to audio problems and rattling noises, as discussed on JustAnswer. These challenges highlight the importance of thorough research and preparation before embarking on a stereo upgrade.</p>
What are the best brands for aftermarket stereos for a 2005 Tundra
<p>The <b>2005 Toyota Tundra</b> is a beloved vehicle known for its reliability and ruggedness, but when it comes to upgrading the stereo system, navigating the wiring can be a daunting task. For those who are eager to enhance their audio experience, understanding the <i>stereo wiring diagram</i> is crucial. This article aims to provide a comprehensive guide to help you identify and connect the wires correctly, ensuring a seamless upgrade process.</p> <p>When upgrading the stereo in a <b>2005 Tundra</b>, several common issues can arise. One of the most frequent problems is the incompatibility of aftermarket head units with the standard Toyota harness adapter, as noted by users on forums like Reddit and Toyota forums. Additionally, issues with the amplifier are common, leading to audio problems and rattling noises, as discussed on JustAnswer. These challenges highlight the importance of thorough research and preparation before embarking on a stereo upgrade.</p>
Which aftermarket stereo brands offer the best sound quality for a 2005 Tundra
<p>The <b>2005 Toyota Tundra</b> is a beloved vehicle known for its reliability and ruggedness, but when it comes to upgrading the stereo system, navigating the wiring can be a daunting task. For those who are eager to enhance their audio experience, understanding the <i>stereo wiring diagram</i> is crucial. This article aims to provide a comprehensive guide to help you identify and connect the wires correctly, ensuring a seamless upgrade process.</p> <p>When upgrading the stereo in a <b>2005 Tundra</b>, several common issues can arise. One of the most frequent problems is the incompatibility of aftermarket head units with the standard Toyota harness adapter, as noted by users on forums like Reddit and Toyota forums. Additionally, issues with the amplifier are common, leading to audio problems and rattling noises, as discussed on JustAnswer. These challenges highlight the importance of thorough research and preparation before embarking on a stereo upgrade.</p>
Best sound systems for 2005 Tundra
The best sound systems for a 2005 Toyota Tundra can be achieved by upgrading the speakers and head unit. Here are some top recommendations:
Infinity Reference Speakers: These speakers are highly praised for their clear sound quality and durability. They are a popular choice among Tundra owners and can significantly improve the audio experience.
Polk Audio DXi6500/6501: These speakers offer excellent sound quality and are known for their reliability. They are a good option for those looking to upgrade their front speakers without replacing the head unit or amplifier.
Kenwood, Sony, or Pioneer Head Units: These brands are well-known for their high-quality audio systems and are often recommended for their compatibility with various aftermarket speakers and amplifiers.
Rockford Fosgate P1675 Punch Speakers: These speakers are known for their powerful sound and are a good choice for those looking to enhance their audio system with high-quality components.
Pioneer DDIN and Polk Audio Speakers: This combination is highly rated for its clear sound and connectivity features, making it a great option for those looking to upgrade their entire audio system.
By choosing these components, you can create a high-quality sound system that enhances the driving experience in your 2005 Toyota Tundra.
Thank you for reading our article on the 2005 Tundra Stereo Wiring Diagram. We hope you found the information helpful in understanding the wiring process for your vehicle. Upgrading your stereo system can significantly enhance your driving experience, and with the right tools and knowledge, you can achieve professional-grade sound quality. Whether you're a seasoned DIY enthusiast or a newcomer to car electronics, our guide aims to provide a comprehensive resource for navigating the stereo wiring diagram and ensuring a seamless upgrade process.
As you continue to explore the world of car audio upgrades, remember that the 2005 Tundra Stereo Wiring Diagram is just the first step. Choosing the right aftermarket stereo brand is crucial for achieving the best sound quality. Brands like Kenwood, Pioneer, and Alpine are known for their high-quality products and compatibility with various vehicle models. By selecting a reputable brand and following our wiring guide, you can transform your 2005 Tundra into a state-of-the-art audio system. We encourage you to share your experiences and tips with our community, as we strive to provide the most informative and helpful content for all car enthusiasts. Happy upgrading!
What are the benefits of using Infinity speakers in a 2005 Tundra
<p>The <b>Infinity</b> speakers are a popular choice for upgrading the audio system in a 2005 Toyota Tundra. One of the primary benefits of using <b>Infinity</b> speakers is their ability to provide clear and detailed sound quality. These speakers are known for their high-fidelity performance, which can significantly enhance the overall audio experience in your vehicle. Additionally, <b>Infinity</b> speakers are often praised for their durability and reliability, making them a great option for those who want a long-lasting upgrade without compromising on sound quality.</p> <p>Another advantage of using <b>Infinity</b> speakers is their compatibility with various aftermarket head units and amplifiers. This flexibility allows you to choose the best components for your specific setup, ensuring that your new speakers integrate seamlessly with your existing audio system. Furthermore, many users have reported that <b>Infinity</b> speakers offer improved bass response compared to the factory JBL speakers, providing a more immersive audio experience. Overall, the combination of clear sound, durability, and compatibility makes <b>Infinity</b> speakers a compelling choice for upgrading the audio system in a 2005 Toyota Tundra.</p>