Learn how to fix your 2000 Chevy Cavalier's horn with the 2000 Chevy Cavalier Horn Wiring Diagram. Get step-by-step instructions and tools needed for a successful repair.
Understanding the 2000 Chevy Cavalier Horn Wiring Diagram is crucial for any car enthusiast or DIY mechanic looking to troubleshoot or install a new horn system in their vehicle. This article will guide you through the process of accessing, interpreting, and using the wiring diagram to fix issues with your car's horn.
Accessing the Horn Wiring Diagram
The first step is to locate the wiring diagram for your 2000 Chevy Cavalier. You can find this information in your car's manual or online resources. Websites like Fixya and RepairPal often provide detailed diagrams and troubleshooting guides for various car models, including the 2000 Chevy Cavalier.
Understanding the Wiring Diagram
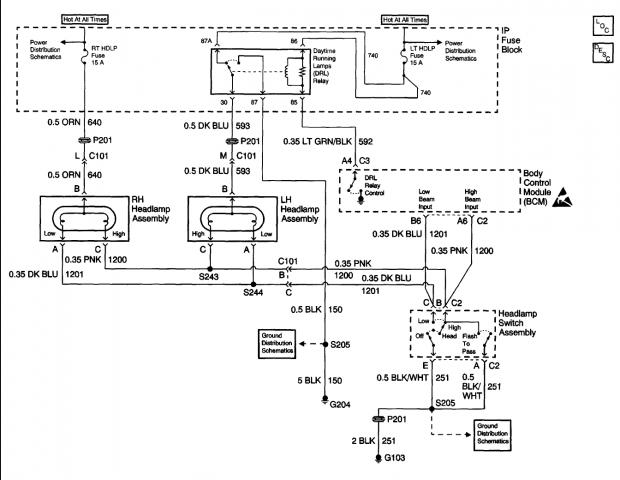
The wiring diagram is a detailed map of the electrical connections involved in the horn circuit. It includes information on wire colors, fuse locations, and other critical components that need to be considered. By understanding this diagram, you can identify and fix issues with your horn system.
Tools Needed for Horn Replacement
To replace the horn on your 2000 Chevy Cavalier, you will need a few tools. These include a socket set, Torx screwdriver, pliers and punch, wire strippers, multimeter, and fuse puller. Having these tools ready will make the process easier and ensure that you have everything you need to complete the job.
Disconnecting Electrical Connections
Once you have accessed the wiring diagram and gathered your tools, it's time to disconnect the electrical connections to the old horn. This involves removing screws or clips holding the horn in place and unplugging the wires from the old horn. Be careful not to damage any wires or components during this process.
Removing the Old Horn
With the electrical connections disconnected, you can now remove the old horn from its mounting bracket. Be mindful of any additional components like clips or brackets that may need to be removed. Take your time and ensure that everything is properly disassembled before proceeding.
Installing the New Horn
Place the new horn into the mounting bracket and secure it with screws or clips. Make sure it's properly seated and aligned. Double-check that all connections are correct and not short-circuited. This is a critical step to ensure that your new horn functions correctly.
Reconnecting Electrical Connections
Reconnect the electrical wires to the new horn, ensuring they are securely attached and not loose. Double-check that all connections are correct and not short-circuited. This step is crucial to ensure that your new horn works properly and safely.
Testing the Horn
Turn on the ignition and test the horn to ensure it's working properly. If it's not working, check for any loose connections or faulty wiring. The wiring diagram should help you identify any issues and provide a solution.
Common Issues and Solutions
Some common issues with the horn system include a shorted horn or faulty contact in the steering wheel. You can start by disconnecting the horn or removing the fuse to diagnose the problem. The wiring diagram will help you identify and fix these issues effectively.
Conclusion
By following these steps and using the 2000 Chevy Cavalier Horn Wiring Diagram, you can successfully replace the horn on your vehicle. Remember to always refer to the wiring diagram for accurate information and to ensure your safety while working with electrical components. If you have any further questions or need additional guidance, feel free to reach out to our community of car enthusiasts. We are always here to help.
The 2000 Chevy Cavalier Horn Wiring Diagram is a crucial tool for any car enthusiast or DIY mechanic looking to troubleshoot or install a new horn system in their vehicle. Understanding the wiring diagram can help you identify and fix issues with the horn, ensuring your car's safety features are functioning properly. Whether you're dealing with a faulty horn or planning to upgrade your car's alarm system, this diagram is essential for getting the job done right.
For those who are new to car wiring, the 2000 Chevy Cavalier Horn Wiring Diagram provides a detailed map of the electrical connections involved in the horn circuit. It includes information on wire colors, fuse locations, and other critical components that need to be considered. By following this diagram, you can avoid common mistakes and ensure that your horn system is installed correctly, providing you with peace of mind and a safer driving experience.
How can I fix a malfunctioning horn on a 2000 Chevy Cavalier
What are the steps to replace the horn on a 2000 Chevy Cavalier

What tools do I need to replace the horn on a 2000 Chevy Cavalier
- Socket Set: A set of sockets to remove the screws or bolts holding the splash shield and the horn in place.
- Torx Screwdriver: If your car uses Torx screws, a Torx screwdriver will be necessary.
- Pliers and Punch: For disconnecting electrical connectors and possibly punching holes for new wiring.
- Wire Strippers: To strip the insulation from the electrical wires.
- Multimeter: To test the electrical connections and ensure they are not short-circuited.
- Fuse Puller: To remove the fuse if you need to disconnect power to the horn.
- Work Light: A work light can be helpful in illuminating the area under the hood.
How can I make my closing message more impactful
- Express Gratitude: Start by expressing your gratitude for the recipient's time and attention. This helps build a positive relationship and shows that you value their input.
- Summarize Key Points: Briefly summarize the main points discussed in your message. This reinforces your argument and makes it easier for the recipient to understand and remember the key information.
- Offer Further Assistance: Show your willingness to help by offering further assistance if needed. This demonstrates your commitment to their success and leaves a lasting impression.
- Invite Feedback: Encourage feedback or suggestions to foster a two-way conversation. This shows that you value their opinion and are open to their ideas, leading to deeper engagement and collaboration.
- Share Additional Resources: Provide additional resources related to the email topic. This adds value to the recipient and demonstrates your commitment to their success.
- Promote Ongoing Engagement: Suggest future communication to maintain a long-term relationship. This can foster continued collaboration and open the door for further opportunities.
Thank you for reading our article on the 2000 Chevy Cavalier Horn Wiring Diagram. We hope that the information provided has been helpful in understanding the wiring diagram and troubleshooting steps for your vehicle. Whether you are a seasoned mechanic or a DIY enthusiast, having a clear and detailed wiring diagram is essential for ensuring that your car's safety features, such as the horn, are functioning correctly. By following the steps outlined in this article, you can confidently diagnose and repair any issues with your horn system, ensuring that your vehicle remains safe and reliable on the road.
We encourage you to explore more resources on car maintenance and repair to continue enhancing your knowledge and skills. Remember, staying informed and up-to-date with the latest information is key to maintaining your vehicle's optimal performance. If you have any further questions or need additional guidance, feel free to reach out to our community of car enthusiasts. We are always here to help. Once again, thank you for visiting our blog, and we look forward to your continued interest in 2000 Chevy Cavalier Horn Wiring Diagram and other automotive topics.
How can I make my closing message more engaging
- Clear and Strong Call to Action: End with a clear and strong call to action that explains what you want the reader to do next and why it matters. For example, "Please let me know your thoughts" or "Awaiting your prompt response."
- Reinforce Key Message: Summarize your main points in a concise and memorable way that reaffirms your argument. This helps reinforce the key message and ensures it stays with the reader.
- Use Rhetorical Questions or Challenges: Encourage the reader's thinking by using rhetorical questions or challenges. For instance, "What will you do next?" or "Can you achieve this goal?"
- Refer Back to the Opening: Connect the closing to the opening in a circular or surprising way to create a sense of completion and coherence. This can be done by referencing a key point from the beginning of the message.
- Employ Quotes, Stories, or Statistics: Use a quote, story, or statistic that summarizes your message and leaves a lasting impression on the reader. This can be a powerful way to conclude and make the message more memorable.
- Consistency and Clarity: Ensure that the closing aligns with the overall message and tone of the content. Avoid introducing new information, apologizing, or ending abruptly, as these can weaken the message or confuse the audience.


No comments:
Post a Comment