
Discover the Bajaj Chetak Wiring Diagram for comprehensive scooter maintenance and repair. Learn how to diagnose and fix electrical issues with detailed schematics and expert tips.

Introduction to the Bajaj Chetak Wiring Diagram
The Bajaj Chetak Wiring Diagram is a crucial document for any scooter enthusiast or mechanic looking to understand the electrical systems of the Bajaj Chetak. This technical document, available since November 2002, provides detailed wiring diagrams and electrical schematics that are essential for diagnosing and repairing issues with the scooter's electrical components. Whether you are a seasoned mechanic or a DIY enthusiast, having access to this diagram can save you time and effort in troubleshooting and fixing common problems.
Importance of the Wiring Diagram
The Bajaj Chetak Wiring Diagram is a comprehensive resource that helps in identifying which circuits do what, allowing you to marry new switches and bulbs onto existing circuits. It also guides you in replacing the fuel hose and indicator wiring, making it a valuable tool for any scooter restoration or modification project. With its detailed information and clear schematics, the Bajaj Chetak Wiring Diagram is an indispensable resource for anyone working on their Bajaj Chetak scooter.
Key Components of the Wiring Diagram
The wiring diagram includes various key components such as the ignition system, battery connections, horn circuit, and indicator lights. Understanding these components is crucial for maintaining and repairing your scooter. The diagram provides detailed information on how each component interacts with the others, ensuring that you can diagnose and fix issues efficiently.
Types of Horn Systems
The Bajaj Chetak uses a shutter-type horn, whereas the Vespa employs an opener-type horn. This difference necessitates the use of specific switches for each type of horn to ensure proper function. For instance, if you are using a Vespa wiring diagram, you will need to purchase the correct switch for the Bajaj Chetak to avoid any issues with the horn.
Common Issues with Horn Systems
The most common issues with horn systems in scooters include faulty horn buttons, blown fuses, defective wiring, and defective plugs. These problems can arise from various factors such as wear and tear, corrosion, or improper installation. Regular maintenance and inspections can help identify and address these issues promptly, ensuring the horn system operates effectively and safely.
Testing and Troubleshooting
Testing the horn with a direct power source can help determine if the issue lies with the horn itself or the scooter's electrical system. This step can help identify if the problem is with the horn or another component. Additionally, using a multimeter to test the voltage at the horn terminals can confirm proper connection and rule out wiring issues.
Professional Assistance
If you are unable to fix the issue yourself, consider seeking professional assistance. A certified technician can accurately diagnose and repair or replace the horn, ensuring it is functioning correctly and safely. They can also provide additional tips and recommendations for maintaining your scooter's electrical systems.
Conclusion
In conclusion, the Bajaj Chetak Wiring Diagram is a vital resource for any scooter enthusiast or mechanic. It provides detailed information and clear schematics that help in diagnosing and repairing issues with the scooter's electrical components. By following the tips and guidelines provided in this article, you can ensure your scooter's horn system operates effectively and safely.
Additional Resources
For more detailed information and additional resources, you can refer to the official Bajaj website or visit forums and communities dedicated to scooter enthusiasts. These resources can provide further insights and tips on maintaining and repairing your scooter's electrical systems.
The Bajaj Chetak Wiring Diagram is a crucial document for any scooter enthusiast or mechanic looking to understand the electrical systems of the Bajaj Chetak. This technical document, available since November 2002, provides detailed wiring diagrams and electrical schematics that are essential for diagnosing and repairing issues with the scooter's electrical components. Whether you are a seasoned mechanic or a DIY enthusiast, having access to this diagram can save you time and effort in troubleshooting and fixing common problems.
For those interested in modifying their Bajaj Chetak, the wiring diagram is also a valuable resource. It helps in identifying which circuits do what, allowing you to marry new switches and bulbs onto existing circuits. Additionally, the diagram can guide you in replacing the fuel hose and indicator wiring, making it a comprehensive tool for any scooter restoration or modification project. With its detailed information and clear schematics, the Bajaj Chetak Wiring Diagram is an indispensable resource for anyone working on their Bajaj Chetak scooter.
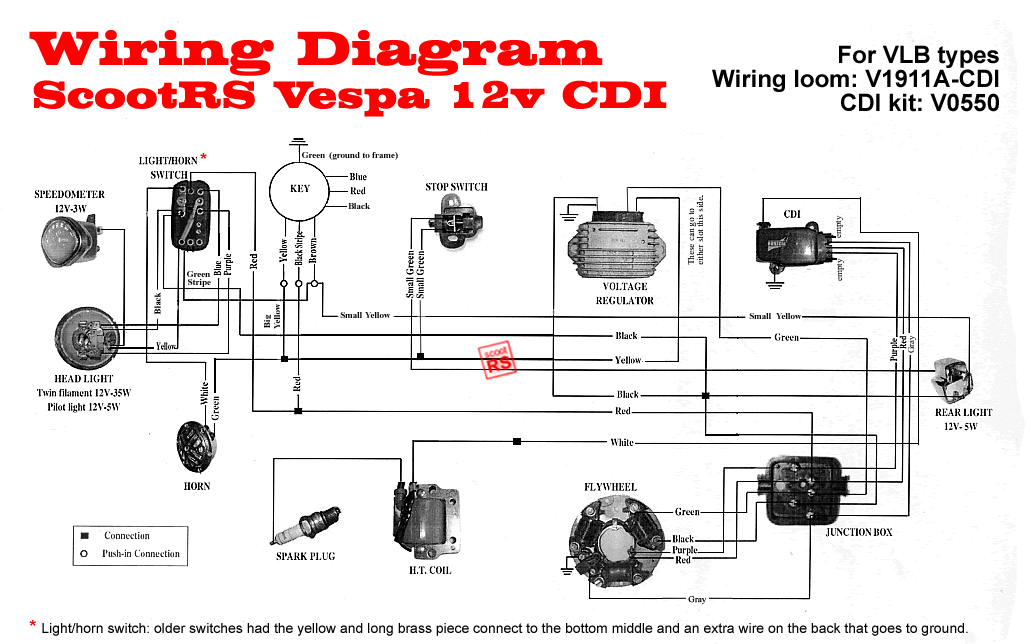
What are the main differences between the Bajaj Chetak and Vespa wiring diagrams
<p>The <b>Bajaj Chetak Wiring Diagram</b> and the Vespa wiring diagram share many similarities, but they also have some notable differences. One of the key differences is the type of horn used. The Vespa uses an opener-type horn, while the Bajaj Chetak uses a shutter-type horn. This means that if you are using a Vespa wiring diagram, you will need to purchase the correct switch for the Bajaj Chetak to ensure proper horn function. Additionally, the indicators used in the Bajaj Chetak are simpler, with a three-wire system that can be easily adapted from Vespa indicators by identifying the green and blue wires and swapping them accordingly. This adaptation can be facilitated by using an electronic LED flasher relay, which is more efficient and longer-lasting than traditional relays.</p> <p>Another significant difference lies in the rectifier. The Bajaj Chetak has a six-wire rectifier, whereas most other scooters have three, four, or five wires. This unique configuration requires specific modifications, such as converting the CDI and coil units to Vespa standards. The exhaust mountings also differ, with the Bajaj Chetak using "Indian Pattern" mountings similar to those found on Vespa T5 models. These differences highlight the importance of using the correct wiring diagram specific to your scooter model to ensure proper electrical function and safety.</p>
What are the specific differences in the horn systems between the Bajaj Chetak and Vespa
<p>The horn systems of the <b>Bajaj Chetak</b> and Vespa exhibit distinct differences. The Bajaj Chetak uses a shutter-type horn, whereas the Vespa employs an opener-type horn. This difference necessitates the use of specific switches for each type of horn to ensure proper function. For instance, if you are using a Vespa wiring diagram, you will need to purchase the correct switch for the Bajaj Chetak to avoid any issues with the horn. This highlights the importance of using the correct wiring diagram specific to your scooter model to maintain electrical integrity and safety.</p> <p>Additionally, the indicators on the Bajaj Chetak operate on a simpler three-wire system, which can be easily adapted from Vespa indicators by identifying the green and blue wires and swapping them accordingly. This adaptation can be facilitated by using an electronic LED flasher relay, which is more efficient and longer-lasting than traditional relays. These differences underscore the need for careful consideration when modifying or repairing electrical systems on these scooters.</p>
Why do the horn systems differ so significantly between the Bajaj Chetak and Vespa

<p>The horn systems of the <b>Bajaj Chetak</b> and Vespa exhibit significant differences. The primary reason for this disparity is the type of horn used in each scooter. The Bajaj Chetak employs a shutter-type horn, whereas the Vespa uses an opener-type horn. This distinction necessitates the use of specific switches for each type of horn to ensure proper function. For instance, if you are using a Vespa wiring diagram, you will need to purchase the correct switch for the Bajaj Chetak to avoid any issues with the horn. This highlights the importance of using the correct wiring diagram specific to your scooter model to maintain electrical integrity and safety.</p> <p>Additionally, the indicators on the Bajaj Chetak operate on a simpler three-wire system, which can be easily adapted from Vespa indicators by identifying the green and blue wires and swapping them accordingly. This adaptation can be facilitated by using an electronic LED flasher relay, which is more efficient and longer-lasting than traditional relays. These differences underscore the need for careful consideration when modifying or repairing electrical systems on these scooters.</p>
Scooter horn maintenance tips
<p>Regular maintenance is essential for ensuring that your scooter horn remains in good working condition. Here are some key tips to help you maintain your scooter horn effectively:</p> <p>1. **Regular Checks**: Periodically inspect the horn for any signs of wear or damage. Check the horn's physical condition, including the diaphragm and terminals, to ensure they are not damaged. If you notice any issues, address them promptly to prevent further problems.</p> <p>2. **Wiring and Connections**: Ensure that the wiring and connections to the horn are secure and not corroded. Loose or disconnected wires can cause the horn to malfunction. Use a multimeter to test the voltage at the horn terminals to confirm proper connection.</p> <p>3. **Cleaning**: Clear any obstructions around the horn to ensure proper sound projection. Clean the horn regularly to remove accumulated dirt or debris that may affect its performance. Use a soft cloth and avoid using harsh chemicals that could damage the horn.</p> <p>4. **Adjustments**: Some horns, especially mechanical ones, may require adjustments to ensure optimal sound quality. Use the screws provided to adjust the horn's settings, ensuring that the circuit is made and broken correctly to produce the desired sound.</p> <p>5. **Testing**: Test the horn with a direct power source to determine if the issue lies with the horn itself or the scooter's electrical system. This step can help identify if the problem is with the horn or another component.</p> <p>6. **Professional Help**: If you are unable to fix the issue yourself, consider seeking professional assistance. A certified technician can accurately diagnose and repair or replace the horn, ensuring it is functioning correctly and safely.</p> <p>By following these maintenance tips, you can ensure your scooter horn operates effectively and safely, enhancing your riding experience.</p>

Thank you for reading our article on the Bajaj Chetak Wiring Diagram. We hope that the information provided has been helpful in understanding the electrical systems of your scooter. Whether you are a seasoned mechanic or a DIY enthusiast, having access to the correct wiring diagram is crucial for diagnosing and repairing issues with the electrical components of your vehicle. The Bajaj Chetak Wiring Diagram is a comprehensive resource that can save you time and effort in troubleshooting and fixing common problems. It is essential to use the correct wiring diagram specific to your scooter model to maintain electrical integrity and safety.
For those interested in modifying their Bajaj Chetak, the wiring diagram is also a valuable resource. It helps in identifying which circuits do what, allowing you to marry new switches and bulbs onto existing circuits. Additionally, the diagram can guide you in replacing the fuel hose and indicator wiring, making it a comprehensive tool for any scooter restoration or modification project. With its detailed information and clear schematics, the Bajaj Chetak Wiring Diagram is an indispensable resource for anyone working on their Bajaj Chetak scooter. We encourage you to explore more resources and guides to enhance your knowledge and skills in scooter maintenance and repair.
What are the most common issues with horn systems in scooters

<p>The most common issues with horn systems in scooters include faulty horn buttons, blown fuses, defective wiring, and defective plugs. These problems can arise from various factors such as wear and tear, corrosion, or improper installation. For instance, a faulty horn button can prevent the horn from functioning properly, while a blown fuse can indicate an electrical overload or short circuit. Defective wiring or plugs can also disrupt the electrical signal to the horn, causing it to malfunction or not work at all. Regular maintenance and inspections can help identify and address these issues promptly, ensuring the horn system operates effectively and safely.</p> <p>Additionally, rust and corrosion can significantly impact the horn system. Rust on electrical components can lead to poor connections and malfunctioning horns. It is essential to waterproof the motor and address any rust on the battery terminals promptly to prevent such issues. Furthermore, periodic checks for signs of damage or wear, such as cracks or corrosion, can help in early detection and prevention of horn system failures. By addressing these common issues, scooter owners can ensure their horn systems remain functional and reliable.</p>

Bajaj Chetak Wiring Diagram


No comments:
Post a Comment